It’s been months since my last posting , I realized that I am very busy to write something here. So to make this blog ‘still alive’ I want to tell you the basic knowledge about Spring MVC (again), how to build Spring MVC with Java Config (less xml) from the scratch, what I mean here is very very scratch … and I intend to continue this posting and separate for many parts
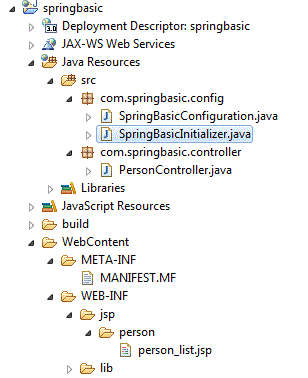
Allow me to show you the project structure. The our project structure is like this :
You can start to build this application by creating a new Dynamic Web Project in your Eclipse IDE
- Click File -> New -> choose Dynamic Web Project a dialog will appear
- put your Project Name as springbasic, click Next
- in the part Web Module at this dialog you need to put Context root and Content directory, let it has default value. The most important things in this part is don’t checklist the Generate web.xml deployment descriptor option because we will start to build an application without web.xml anymore
- Click Finish
After creation project, we can start to include the all dependencies jar library that necessary to build a minimal Spring MVC project. Look at this picture
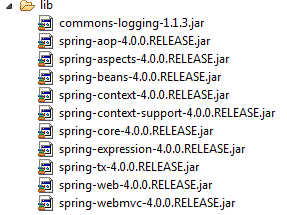
you can get these library by downloading from the official Spring Framework website and especially for commons-logging, you can grab it from the Apache Common Logging.
I know that adding jar dependencies one by one it’s so boring, and there is another way it’s so much pretty which is adding library dependency using Library Dependency Management such as Maven, Gradle. But as I mentioned above that we will build an Spring Web Application from the scratch.
After you finished adding Spring dependencies, let’s start to coding by creating Java Classes. The first class is named SpringBasicInitializer, this class will act as replacement of web.xml. Please create this class in com.springbasic.config package.
package com.springbasic.config;

import javax.servlet.ServletContext;
import javax.servlet.ServletException;
import javax.servlet.ServletRegistration;

import org.springframework.web.WebApplicationInitializer;
import org.springframework.web.context.support.AnnotationConfigWebApplicationContext;
import org.springframework.web.servlet.DispatcherServlet;

public class SpringBasicInitializer
	implements WebApplicationInitializer{

	@Override
	public void onStartup(ServletContext container)
				throws ServletException {

		AnnotationConfigWebApplicationContext ctx = new AnnotationConfigWebApplicationContext();
		ctx.register(SpringBasicConfiguration.class);// registering config, possible to add more than once
		ctx.setServletContext(container);

		ServletRegistration.Dynamic servlet = container.addServlet("dispatcher", new DispatcherServlet(ctx));
		servlet.setLoadOnStartup(1);
		servlet.addMapping("/");
	}

}
And the second class is SpringBasicConfiguration. This class will act as replacement of spring-servlet.xml if you use xml config.
package com.springbasic.config;

import org.springframework.context.annotation.Bean;
import org.springframework.context.annotation.ComponentScan;
import org.springframework.context.annotation.Configuration;
import org.springframework.web.servlet.ViewResolver;
import org.springframework.web.servlet.config.annotation.EnableWebMvc;
import org.springframework.web.servlet.view.InternalResourceViewResolver;

@Configuration
@EnableWebMvc
@ComponentScan(basePackages = "com.springbasic")
public class SpringBasicConfiguration {

	@Bean
	public ViewResolver viewResolver(){
		InternalResourceViewResolver viewResolver =
				new InternalResourceViewResolver();

		viewResolver.setPrefix("/WEB-INF/jsp");
		viewResolver.setSuffix(".jsp");
		return viewResolver;
	}

}
and the last class, we will create a simple controller class named PersonController in the com.springbasic.controller package
package com.springbasic.controller;

import org.springframework.stereotype.Controller;
import org.springframework.ui.Model;
import org.springframework.web.bind.annotation.RequestMapping;
import org.springframework.web.bind.annotation.RequestMethod;

@Controller
@RequestMapping("/person")
public class PersonController {

	@RequestMapping(method = RequestMethod.GET)
	public String defaultHandler(Model model){
		model.addAttribute("message", "Message from Person Controller");
		return "/person/person_list";
	}
}
and the last we will create a JSP file within WEB-INF/jsp/person directory which named person_list.jsp
<html>
	<head>
		<title>Personal Module</title>
	</head>
	<body>
		<%
			String message = (String) request.getAttribute("message");
		%>

		<h2>what is message from controller : <%=message %></h2>
	</body>
</html>
I know that in the real development we will use the some tag libraries in your JSP pages such as JSTL, but again in this tutorial I want to tell you how to develop something from very very scratch
Adding project to your Tomcat, run it .. and see at web browser
