Hi everyone, this is the 2nd sequel from my last posting. In the previous posting we have learned to build a Spring Web Application (less xml) from the scratch (adding project, library, and so on).In this posting I will tell you basic knowledge how to integrate your previous application with Hibernate and Postgresql. So in this lesson I assume you already have successfully to run the previous project, so I don’t need to explain how to create project and bla bla bla.
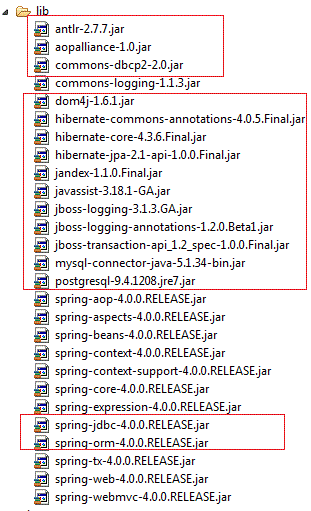
Okay the first thing that you shall do is adding library dependencies for Hibernate. Let’s look at my picture :

As you can see at my picture there are several jar files that I have added into WEB-INF/lib directory (red line border). And this is the poor aspect if you’re not using Library Dependency Management such as Maven, you need to add one-by-one jar files and sometimes you don’t actually know if your library having conflict or redundant. But anyway we will make it slowly, I will explain Library Dependency Management in another post.
And then the next step is we need to adding some hibernate configuration in our configuration class. So, go to SpringBasicConfiguration.java and add some configurations.
package com.springbasic.config;

import java.util.Properties;

import javax.sql.DataSource;

import org.apache.tomcat.dbcp.dbcp.BasicDataSource;
import org.hibernate.SessionFactory;
import org.springframework.context.annotation.Bean;
import org.springframework.context.annotation.ComponentScan;
import org.springframework.context.annotation.Configuration;
import org.springframework.orm.hibernate4.HibernateTransactionManager;
import org.springframework.orm.hibernate4.LocalSessionFactoryBean;
import org.springframework.transaction.annotation.EnableTransactionManagement;
import org.springframework.web.servlet.ViewResolver;
import org.springframework.web.servlet.config.annotation.EnableWebMvc;
import org.springframework.web.servlet.view.InternalResourceViewResolver;

@Configuration
@EnableWebMvc
@ComponentScan(basePackages = "com.springbasic")
@EnableTransactionManagement
public class SpringBasicConfiguration {

	@Bean
	public ViewResolver viewResolver(){
		InternalResourceViewResolver viewResolver =
				new InternalResourceViewResolver();

		viewResolver.setPrefix("/WEB-INF/jsp");
		viewResolver.setSuffix(".jsp");
		return viewResolver;
	}

	@Bean(name = "dataSource")
	public DataSource getDataSource(){
		BasicDataSource dataSource = new BasicDataSource();
		/* use this connection if you want to use mysql
		 * dataSource.setDriverClassName("com.mysql.jdbc.Driver");
		dataSource.setUrl("jdbc:mysql://localhost:3306/learn");
		dataSource.setUsername("root");
		dataSource.setPassword("123456");
		*/
		dataSource.setDriverClassName("org.postgresql.Driver");
		dataSource.setUrl("jdbc:postgresql://localhost:5432/learn_hibernate");
		dataSource.setUsername("postgres");
		dataSource.setPassword("postgres");
		return dataSource;
	}

	private Properties getHibernateProperties(){
		Properties properties = new Properties();
		properties.put("hibernate.show_sql", "true");
    	/*properties.put("hibernate.dialect", "org.hibernate.dialect.MySQLDialect");*/
		properties.put("hibernate.dialect", "org.hibernate.dialect.PostgreSQLDialect");
    	properties.put("hibernate.hbm2ddl.auto", "create");
		return properties;
	}

	@Bean(name = "sessionFactory")
	public LocalSessionFactoryBean sessionFactory(){
		LocalSessionFactoryBean sessionFactory = new LocalSessionFactoryBean();
		sessionFactory.setDataSource(getDataSource());
		sessionFactory.setPackagesToScan("com.springbasic");
		sessionFactory.setHibernateProperties(getHibernateProperties());
		return sessionFactory;
	}

	@Bean
	public HibernateTransactionManager transactionManager(SessionFactory sessionFactory){
		HibernateTransactionManager txManager = new HibernateTransactionManager();
		txManager.setSessionFactory(sessionFactory);
		return txManager;
	}
}
There are several things that I need to explain in this part.
- Data Source. In this example, we are using a Simple Data Source was provided by Java EE (javax.sql.DataSource). In the real development or production server, you could setup your datasource in your Application Server such as JBOSS. Datasource contains your connection profile / information such as driver class name, database url and your credential access.
- Hibernate Properties. In the real development project, most of people put their configuration in a Properties file (*.properties). It could be maintainable because your all configurations stored in one place. But don’t think so hard, we start from the scratch. The most important things in here is Hibernate Properties actually telling the hibernate what is database provider that we will use (hibernate dialect), generating table schema from the POJO side (hbm2ddl.auto), and many more. Please refer this link for the detail Hibernate Properties options.
- Building Session Factory. Session Factory is the factory class to create a session in hibernate. And the Session in hibernate will be used for each transaction in hibernate. In other words if you want to select something from your table, you should have a hibernate session and then you can get your object (we will see later)
- Transaction Management. Hibernate also using Transaction Management to manage their session. Because hibernate session will be used for every single transaction they consider to avoid unmanageable transaction.
After this configuration has finished, we can continue to create a POJO. You know that POJO is actually representation of table in your db, so each table in your db will be mapped as object in application side as POJO.
package com.springbasic.model;

import java.io.Serializable;

import javax.persistence.Column;
import javax.persistence.Entity;
import javax.persistence.GeneratedValue;
import javax.persistence.Id;
import javax.persistence.Table;

@Entity
@Table(name="Person")
public class Person implements Serializable{
	private static final long serialVersionUID = 1L;

	@Id
	@GeneratedValue
	private Long id;

	@Column
	private String firstName;

	public Person(){}

	public Long getId() {
		return id;
	}

	public void setId(Long id) {
		this.id = id;
	}

	public String getFirstName() {
		return firstName;
	}

	public void setFirstName(String firstName) {
		this.firstName = firstName;
	}

}
We will create an abstract class for DAO layer. In this class we will bounding the SessionFactory.
package com.springbasic.dao;

import org.hibernate.Session;
import org.hibernate.SessionFactory;
import org.springframework.beans.factory.annotation.Autowired;

public abstract class AbstractDAO {

	@Autowired
	private SessionFactory sessionFactory;

	protected Session getSession(){
		return sessionFactory.getCurrentSession();
	}
}
and then we can continue to DAO Layer. DAO is stand for Data Access Object, it contains an interface and class which implements it. DAO interface contains several method which related with the DML function such as save, update, delete, find by primary key. These functions is purposely designed for particularly object (let say you have a Person POJO, so you should have PersonDAO and PersonDAOImpl)
package com.springbasic.dao;

import com.springbasic.model.Person;

public interface PersonDAO {

	public void savePerson(Person person);
}
package com.springbasic.dao;

import org.springframework.stereotype.Repository;

import com.springbasic.model.Person;

@Repository("personDAO")
public class PersonDAOImpl extends AbstractDAO implements PersonDAO {

	@Override
	public void savePerson(Person person) {
		getSession().save(person);
	}

}
And next step is creating Service Layer. Like a DAO layer, Service layer also containing an interface and class implements. The differences between Service and DAO layer is Service layer contains more complexity of method, not just a DML operation but Service layer more concentrate to your business function.
package com.springbasic.service;

import com.springbasic.model.Person;

public interface PersonService {
	public void savePerson(Person person);
}
package com.springbasic.service;

import org.springframework.beans.factory.annotation.Autowired;
import org.springframework.stereotype.Service;
import org.springframework.transaction.annotation.Transactional;

import com.springbasic.dao.PersonDAO;
import com.springbasic.model.Person;

@Service("personService")
@Transactional
public class PersonServiceImpl implements PersonService{

	@Autowired
	private PersonDAO personDAO;

	@Override
	public void savePerson(Person person) {
		personDAO.savePerson(person);
	}

}
and the last step you can modify your PersonController.java by inserting an object Person when /person URL is called
package com.springbasic.controller;

import javax.annotation.Resource;

import org.springframework.stereotype.Controller;
import org.springframework.ui.Model;
import org.springframework.web.bind.annotation.RequestMapping;
import org.springframework.web.bind.annotation.RequestMethod;

import com.springbasic.model.Person;
import com.springbasic.service.PersonService;

@Controller
@RequestMapping("/person")
public class PersonController {

	@Resource
	private PersonService personService;

	@RequestMapping(method = RequestMethod.GET)
	public String defaultHandler(Model model){

		Person p = new Person();
		p.setId(1L);
		p.setFirstName("Ungu");

		personService.savePerson(p);

		model.addAttribute("message", "Message from Person Controller");
		return "/person/person_list";
	}
}
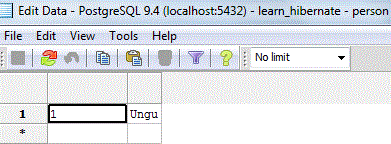
Start your tomcat, and open your browser, access http://localhost:8080/springbasic/person and look at your Postgresql db
