![]()
In this article, I’ll explain about Workflow in Liferay. In this part, we will learn how to use workflow using Activiti Business Process Management in Liferay. Before this, I would like to introduce the environment which I used.
- Liferay Portal 6.2 CE ga3 bundle Tomcat
- MySQL
- Activity Core (Engine) : This will help us to apply workflow on any Business Process. (download here)
- Activity Explorer : This is drag and drop UI Workflow Designer. (download here)
Point 1 : About Kaleo and Activity
as default Kaleo has installed in Liferay bundling, Kaleo is also great to perform workflow business process management in liferay, but the main problem is Kaleo workflow designer doesn’t free. To check Kaleo is enabled in your liferay system you can login as superadmin then go to Admin -> Control Panel.

Kaleo as the default workflow
Figure 1.1 Kaleo is installed as default workflow
In this tutorial we will use Activiti Workflow, so uninstall Kaleo first. You can recheck the Control Panel page to ensure Kaleo has successfully uninstalled in your Liferay System (Configuration -> Workflow will disappear). Okay, it’s time to installing Activity Workflow Engine & Activity Explorer. You can deploy activiti-web-6.2.0.14.war and activiti-explorer.war by place the war file into auto-deploy directory (I assume you’ve basic knowledge about Liferay, so I don’t need to describe what is an auto-deploy directory in Liferay). If deployment was successful, you can go to Admin -> Control Panel (again) and see Configuration -> Workflow will appear (again).
Point 2 : Using Workflow
Download sample workflow here , I will explain how to create a workflow process with activity explorer in next post (Insya Allah). After download sample workflow file, please upload workflow definition by go to Admin -> Control Panel -> Configuration -> Workflow -> Upload Definition.

Upload Workflow Definition
Figure 1.2 Upload Workflow Definition
Fill up the title and browse the XML workflow definition then click Save Button

Fill Up Title and Browse File
Figure 1.3 Fill Up Title and Browse file
Your process definition will display in table grid

Workflow Definition has Uploaded
Figure 1.4 Workflow Definition has uploaded
Switch to Default Configuration tab and assign process definition to resources of your choice (Blog Entry for sample) and click Save button.

Assign Workflow to Resource (Portlet)
Figure 1.5 Assign Workflow to Resource (Portlet)
Point 3 : Trying Workflow Process
The last point in this post we will try to Add a Blog Entry and then we will see how the workflow is worked.
Add new blog post

Add New Blog Post
Figure 1.6 Add New Blog Post
Fill up form Blog and click Submit for Publication

Fill Up Blog Form
Figure 1.7 Fill Up Blog Post
Go to My Account ( Your Account Name at dockbar -> My Account) -> My Workflow Tasks

Workflow Task
Figure 1.8 My Workflow Tasks
Click Action -> Assign to Me and fill up comment and click OK

Assign Task
Figure 1.9 Assign to Me
Task will move to Assign to Me, Click Action -> Approve

Approve Content
Figure 1.10 Approve Content
Give Comment
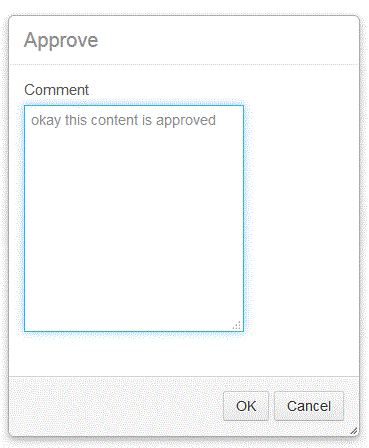
Give Comment
Figure 1.11 Give Comment
Sign Out and goto Blog Page, Content has published

Content has Published
Figure 1.12 Content has Published